警告
本文最后更新于 2023-09-30,文中内容可能已过时。
中转:速度不重要,隐蔽性、抗干扰性第一。
1. 安装 V2Ray
安装方法有很多,这里就直接用官方提供的脚本:
1
| bash <(curl -L -s https://install.direct/go.sh)
|
脚本会自动安装这些东西:
/usr/bin/v2ray/v2ray V2Ray 程序/usr/bin/v2ray/v2ctl V2Ray 工具/etc/v2ray/config.json 配置文件/usr/bin/v2ray/geoip.dat IP 数据文件/usr/bin/v2ray/geosite.dat 域名数据文件/etc/systemd/system/v2ray.service Systemd Service/etc/init.d/v2ray SysV 启动脚本
2. 配置 V2Ray 服务端
虽然严格来说 V2Ray 并不分客户端和服务端……反正就是那个意思啦。
编辑配置文件 /etc/v2ray/config.json:
 1
 2
 3
 4
 5
 6
 7
 8
 9
10
11
12
13
14
15
16
17
18
19
20
21
22
23
24
25
26
27
28
29
30
31
32
33
34
35
36
37
38
39
40
41
42
43
44
| {
"inbounds": [{
"port": 10086,
// 因为还要用 Nginx 反代,这里直接监听本地就行
"listen": "127.0.0.1",
"protocol": "vmess",
"settings": {
"clients": [
{
// 用户 UUID,自己随机弄一个
"id": "23ad6b10-8d1a-40f7-8ad0-e3e35cd38297",
"level": 1,
"alterId": 64
}
]
},
"streamSettings": {
// 指定底层传输方式为 WebSocket
"network": "ws",
"wsSettings": {
// 在哪个路径上提供 WS 服务,可自定义
"path": "/whatever"
}
}
}],
"outbounds": [{
"protocol": "freedom",
"settings": {}
},{
"protocol": "blackhole",
"settings": {},
"tag": "blocked"
}],
"routing": {
"rules": [
{
// 默认规则,禁止访问服务器内网
"type": "field",
"ip": ["geoip:private"],
"outboundTag": "blocked"
}
]
}
}
|
上述配置是直接基于默认配置修改的,V2Ray 的配置很灵活,还有很多可以完善的地方。不过配置调优并不是本文的重点,所以这里按下不表,有兴趣可以自行阅读官方文档。
3. 运行 V2Ray
配置完了,运行一下:
如果你的服务器不用 Systemd:
1
2
3
4
5
| service v2ray start
# 要么
/etc/init.d/v2ray start
# 或者手动运行
/usr/bin/v2ray/v2ray -config /etc/v2ray/config.json
|
测试一下有没有跑起来:
1
| curl -i http://127.0.0.1:10086/whatever
|
1
2
3
4
5
6
7
8
| HTTP/1.1 400 Bad Request
Content-Type: text/plain; charset=utf-8
Sec-Websocket-Version: 13
X-Content-Type-Options: nosniff
Date: Sun, 12 Jan 2020 11:45:14 GMT
Content-Length: 12
Bad Request
|
注意 curl 访问的端口和路径要和上面 V2Ray 中配置的一致,出现 400 Bad Request 就对了。
4. 配置 Nginx
毕竟要隐蔽嘛,最好是选一个已经上线的正常网站,悄咪咪地把其中一个路径反代到我们的 V2Ray 上。
网上不少 V2Ray + WebSocket + TLS 的教程里,Web 服务器 + SSL 证书的配置都是重头戏。可如果你平时就有在捣鼓网站的话,这些实在是都不算啥……所以我这里也就一笔带过了。
以 Nginx 为例,找个合适的 server {} 块添加以下内容(这重定向语法够蛋疼的):
 1
 2
 3
 4
 5
 6
 7
 8
 9
10
11
12
13
14
15
16
17
18
19
20
21
22
23
24
| location /whatever {
proxy_redirect off;
proxy_http_version 1.1;
proxy_set_header Upgrade $http_upgrade;
proxy_set_header Connection "upgrade";
proxy_set_header Host $http_host;
proxy_set_header X-Real-IP $remote_addr;
proxy_set_header X-Forwarded-For $proxy_add_x_forwarded_for;
set $is_v2ray 0;
if ($http_upgrade = "websocket") {
set $is_v2ray 1;
}
if ($is_v2ray = 1) {
# 仅当请求为 WebSocket 时才反代到 V2Ray
proxy_pass http://127.0.0.1:10086;
}
if ($is_v2ray = 0) {
# 否则显示正常网页
rewrite ^/(.*)$ /mask-page last;
}
}
|
注意 location 的路径要和上面 V2Ray 里配置的一样。
最后完整的 Nginx 配置大概类似这样:
 1
 2
 3
 4
 5
 6
 7
 8
 9
10
11
12
13
14
15
16
17
18
19
20
21
22
23
24
| server {
listen 443 ssl http2;
server_name example.com;
index index.html index.htm index.php;
root /data/wwwroot/example;
ssl_certificate /etc/letsencrypt/live/example.com/fullchain.pem;
ssl_certificate_key /etc/letsencrypt/live/example.com/privkey.pem;
ssl_session_cache shared:SSL:10m;
ssl_session_timeout 10m;
ssl_protocols TLSv1.2 TLSv1.3;
ssl_prefer_server_ciphers on;
ssl_ciphers EECDH+AESGCM:EDH+AESGCM;
location ~ [^/]\.php(/|$) {
fastcgi_pass unix:/dev/shm/php-cgi.sock;
fastcgi_index index.php;
include fastcgi.conf;
}
location /whatever {
# ...
}
}
|
表面看上去像个正常 PHP 网站,/whatever 里才是大有乾坤。
再把路径和网站内容搞得唬人一点,我寻思隐蔽性方面应该是没问题的。
5. 配置 CloudFlare
呃,这个就不用讲什么了吧。还不说声多谢 CloudFlare 哥?
CDN 配置完了再用 curl 测试一下:
1
| curl -i https://example.com/whatever
|
 1
 2
 3
 4
 5
 6
 7
 8
 9
10
| HTTP/2 400
date: Sun, 12 Jan 2020 08:44:07 GMT
content-type: text/plain; charset=utf-8
content-length: 12
sec-websocket-version: 13
x-content-type-options: nosniff
cf-cache-status: DYNAMIC
expect-ct: max-age=604800, report-uri="https://report-uri.cloudflare.com/cdn-cgi/beacon/expect-ct" server: cloudflare
Bad Request
|
同样也是出现 400 Bad Request 就对了。
如果你像我上面一样在 Nginx 中配置了 $http_upgrade = "websocket" 的判断的话,这里返回的会是用于伪装的那个页面(而且 Nginx 的 $http_upgrade 变量不知道是按什么赋值的,直接 curl --header "Upgrade: websocket" 的话还不认,怪得很)。可以使用 wscat 来测试:
1
| wscat -c wss://example.com/whatever
|
1
| Connected (press CTRL+C to quit)
|
6. 配置 V2Ray 客户端
客户端配置文件大概改成这样:
 1
 2
 3
 4
 5
 6
 7
 8
 9
10
11
12
13
14
15
16
17
18
19
20
21
22
23
24
25
26
27
28
29
30
31
32
33
34
35
36
37
38
39
40
41
42
43
44
45
46
47
48
49
50
| {
"log": {
"loglevel": "warning"
},
"inbounds": [{
// 本地代理配置
"port": 1080,
"listen": "127.0.0.1",
"protocol": "socks",
"settings": {
"auth": "noauth",
"udp": false,
"ip": "127.0.0.1"
}
}],
"outbounds": [{
"protocol": "vmess",
"settings": {
"vnext": [
{
// 套过 CloudFlare 的网址
"address": "example.com",
"port": 443,
"users": [
{
// id 和 alterId 必须和服务端上配置的一样
"id": "23ad6b10-8d1a-40f7-8ad0-e3e35cd38297",
"alterId": 64
}
]
}
]
},
"streamSettings": {
// 传输协议为 WebSocket
"network": "ws",
// 底层传输安全为 TLS
"security": "tls",
"wsSettings": {
// 路径要和上面设置的一样
"path": "/whatever"
}
}
}],
"policy": {
"levels": {
"0": {"uplinkOnly": 0}
}
}
}
|
上述客户端配置同样也是简化的,路由、DNS 什么的都没设置。
当然,我估计桌面用户基本上用的都是各种图形客户端,不然可不是折腾自己嘛。以 Windows 上的 v2rayN 客户端为例,你可以这样添加服务器:
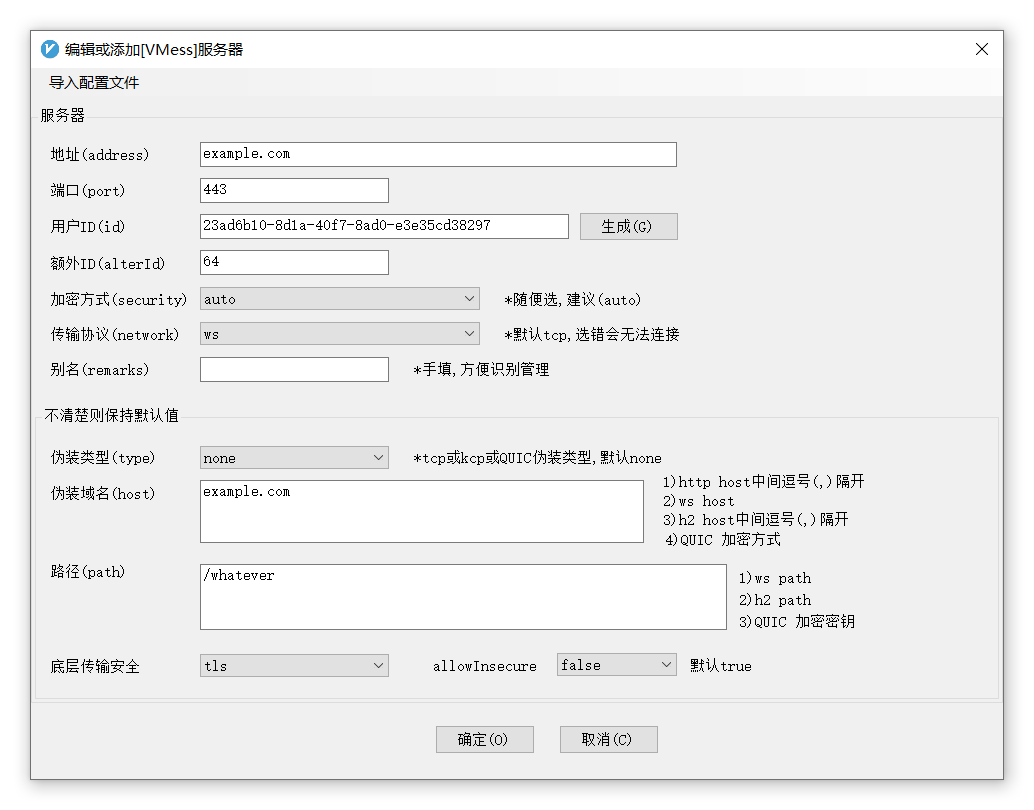
不出意外就可以正常使用了。
常见问题
TUN模式,开启热点连接暴增
- 开启热点分享功能,此时系统网络设置中会生成一个网卡
- 开启 TUN 模式
- 进入系统网络设置,在 Clash 网卡右键选择属性,选择共享标签页
- 勾选“允许其他网络用户通过此计算机的 Internet 连接来连接”
- 在“家庭网络连接”选择框中选择第 1 步生成的网卡
 networdk-adaptor.jpg
参考链接: